Reef
Blog
How to set up a sump for aquarium
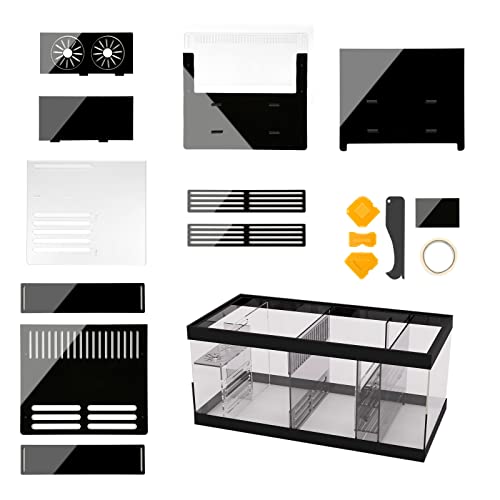


A sump is a highly beneficial addition to any aquarium setup. It provides a dedicated space to house and maintain essential equipment, such as heaters, protein skimmers, and filtration units. Setting up a sump may seem like a daunting task, but with proper guidance, it can be a relatively simple and rewarding experience.
Before diving into the sump setup process, it’s crucial to understand its primary purpose. A sump serves as an overflow chamber for the aquarium, ensuring water levels remain stable and free from contaminants. By separating equipment, it also reduces clutter within the main tank, creating a visually pleasing and healthier environment for aquatic life.
To begin setting up a sump, start by selecting an appropriate sump tank with sufficient capacity to accommodate the desired equipment. It should be placed below the main aquarium to allow water to flow into it naturally. Next, connect the sump tank to the main tank using PVC pipes or flexible tubing, ensuring a secure and watertight connection.

Once the sump is securely connected, install the necessary equipment, such as a heater to regulate water temperature and a protein skimmer to remove organic waste. Additionally, consider adding a mechanical filter to remove debris and a biological filter to establish a healthy population of beneficial bacteria. It is also advisable to include a return pump to circulate water back into the main tank.
In conclusion, setting up a sump for your aquarium can greatly enhance the overall health and appearance of your aquatic ecosystem. By providing a dedicated space for essential equipment, a sump helps maintain water quality, reduces clutter, and creates a more visually appealing aquarium. With proper planning and installation, your sump setup can be a straightforward and rewarding project.
Choosing the Right Sump
When setting up a sump for your aquarium, it is important to choose the right sump that meets your specific needs and requirements. Here are some factors to consider when selecting a sump:
- Size: The size of the sump will depend on the size of your aquarium and the amount of water you want to filter. Make sure the sump is large enough to accommodate the volume of water that needs to be filtered.
- Design: There are several different designs of sumps available, including wet/dry, Berlin, and refugium sumps. Each design has its own advantages and disadvantages, so consider your filtration goals and choose a design that suits your needs.
- Baffle System: The baffle system in the sump helps to divide the different chambers and compartments. Consider the type and placement of baffles in the sump to ensure proper water flow and filtration.
- Space: Consider the space available for the sump. It should fit comfortably in the designated area and have easy access for maintenance and cleaning.
- Noise Level: Some sumps can generate noise, especially if they have pumps or other equipment. Consider the noise level of the sump and choose a model that operates quietly.
- Quality: Choose a sump made from durable materials that can withstand the demands of an aquarium environment. Look for sumps with good craftsmanship and reputable brands.
- Budget: Consider your budget when choosing a sump. Prices can vary depending on the size and features of the sump. It is important to find a balance between quality and affordability.
Overall, choosing the right sump is crucial for the success of your aquarium. Take the time to research and consider your options to ensure that you select a sump that will effectively filter and maintain the water quality in your aquarium.
Determining the Placement
Choosing the right location for your sump is crucial for its proper function. Consider the following factors when determining the placement of your sump:
Accessibility
Select a location that is easily accessible for maintenance and cleaning purposes. You will need to regularly check the sump and perform routine maintenance, so make sure it is located in a convenient spot.
Noise Level
Avoid placing the sump in an area where noise will be an issue. Sumps can produce some level of noise due to the equipment and water flow, so choose a location away from living spaces or areas where excessive noise would be a problem.
Additionally, consider using noise-reducing measures such as placing the sump on a foam pad or using sound dampening materials to minimize noise.
Water Flow
Ensure that the sump can receive a constant flow of water from the aquarium. The placement should allow for easy connection to the overflow system or through-holes in the aquarium. The water should flow smoothly and without any obstructions.
Consider the plumbing requirements and make sure the sump is positioned in a way that allows for easy connection and maintenance of the plumbing system.
By carefully considering these factors, you can determine the ideal placement for your sump and set it up for success.
Setting Up the Overflow
The overflow is an important component of a sump system as it ensures that excess water from the aquarium flows into the sump, preventing overflow and potential damage to your floor or other surrounding areas. Here, we will go over the steps to set up the overflow for your aquarium sump.
Choosing the Right Overflow
The first step is to choose the right overflow for your aquarium. There are several types available, including hang-on-back (HOB) overflows and drilled overflows. HOB overflows are easier to install and can be attached to the back of your aquarium, while drilled overflows require drilling holes in the tank itself.
Consider the size of your aquarium and the amount of water it holds when choosing an overflow. Make sure it is capable of handling the flow rate and volume of water in your tank.
Installation Process
Once you have chosen the appropriate overflow, you can proceed with the installation process.
First, clean the area where the overflow will be placed to ensure a secure fit. Next, position the overflow against the back of the aquarium and mark the drilling holes if necessary.
If you are using a HOB overflow, simply follow the manufacturer’s instructions to attach it to the aquarium. Make sure it is securely fastened and levelled to prevent any water leakage or instability.
If you are using a drilled overflow, carefully drill the necessary holes in the back of the tank according to the marked locations. Take your time and use proper drilling techniques to avoid damaging the glass. After drilling, attach the bulkhead fittings to the holes and secure them tightly using appropriate tools.
Finally, connect the overflow to the plumbing system that will direct the excess water into the sump. This may involve attaching pipes, fittings, and/or valves. Ensure that all connections are tight and properly sealed to prevent any leaks.
Before completing the installation, fill the aquarium with water and test the overflow system. Check for any leaks or irregularities in the water flow. Make adjustments as necessary.
Once everything is functioning properly, you can continue with the installation of other components in your sump system, such as the return pump and the media chamber.
Remember to regularly maintain and clean your overflow and sump system to prevent any blockages or malfunctions.
Setting up the overflow for your aquarium sump is an essential step in creating a reliable and efficient filtration system. Take your time to carefully choose and install the right overflow, ensure proper connections, and regularly maintain the system to keep your aquarium environment clean and healthy for your aquatic pets.
Installing the Sump
Once you have gathered all the necessary equipment for your sump, it’s time to install it in your aquarium system. Follow these steps to properly set up your sump:
Step 1: Choose the Right Location
First, find a suitable location for your sump. It should be somewhere near your aquarium setup, but also easily accessible for maintenance and cleaning. Make sure the area is level and stable to prevent any accidents.
Step 2: Prepare the Equipment
Before installing the sump, prepare all the equipment you will need. This includes the sump itself, a return pump, plumbing fittings, hoses, and any additional accessories like a protein skimmer or media reactors. Inspect each item to ensure they are in good working condition.
Step 3: Measure and Cut Plumbing
Measure the distance between your aquarium’s overflow system and the sump. Use these measurements to cut the plumbing to the desired length. Make sure to account for any bends or curves in the plumbing route. Use a saw or PVC pipe cutter to make clean, precise cuts.
Step 4: Install the Overflow Box
If you are using an overflow box, install it in your aquarium according to the manufacturer’s instructions. Ensure it is securely attached and properly sealed to prevent leaks. Test the overflow system to ensure proper water flow before proceeding.
Step 5: Connect the Plumbing
Connect the plumbing components, including the overflow system, return pump, and any additional equipment you are using. Use appropriate plumbing fittings and hose clamps to secure the connections. Double-check all fittings and connections to ensure they are tight and leak-free.
Step 6: Set Up the Sump
Place the sump in its designated location, and ensure it is level. Connect the plumbing from the overflow system to the appropriate inlet in the sump. Attach the return pump to the return line in the sump. Make sure all connections are secure and properly sealed.
Step 7: Test the System
Once everything is set up, fill your aquarium with water and test the entire system. Check for any leaks, unusual noises, or malfunctions. Adjust the water level in the sump if necessary. Monitor the system for a few days to ensure it is functioning properly before adding any fish or other inhabitants.
Step 8: Maintenance and Troubleshooting
Regularly inspect and maintain your sump system. Clean or replace filter media, check for clogs, and ensure proper water flow. Monitor water parameters to detect any issues early on. If you encounter any problems, refer to the manufacturer’s instructions or consult with an aquarium professional for troubleshooting assistance.
Following these steps and properly installing your sump will help maintain a healthy and stable aquatic environment for your aquarium inhabitants.
“Question-Answer”
What is a sump for an aquarium?
A sump is an additional tank that is placed below the main aquarium in order to increase the total water volume and provide additional filtration options.
Why should I set up a sump for my aquarium?
Setting up a sump for your aquarium has several benefits. It increases the total water volume, which helps to stabilize water parameters and dilute toxins. It also provides a space for additional filtration equipment, such as a protein skimmer or media reactors.
How do I set up a sump for my aquarium?
To set up a sump for your aquarium, you will need a separate tank that is placed below the main aquarium. Install an overflow box or drill holes in the main tank to create a gravity-fed flow of water into the sump. The sump should contain filtration media, such as foam, activated carbon, and biological media. Connect the sump to the main tank using appropriately sized PVC pipes and a return pump to circulate water back into the main tank.
What equipment do I need to set up a sump for my aquarium?
To set up a sump for your aquarium, you will need a separate tank or aquarium, an overflow box or a way to create a gravity-fed flow of water into the sump, filtration media such as foam or activated carbon, a return pump to circulate water back into the main tank, and appropriately sized PVC pipes and fittings to connect the sump to the main tank.

Can I set up a sump for my existing aquarium?
Yes, you can set up a sump for your existing aquarium. It may require some modifications, such as drilling holes in the main tank or installing an overflow box. However, if you are not comfortable with these modifications, there are alternative options available, such as hang-on-back sump systems that do not require any drilling.
What is a sump in an aquarium?
A sump is an additional aquarium tank that is connected to the main display tank. It is usually placed below the main tank and serves as a filtration system to remove waste and debris from the water.
Why would I need a sump for my aquarium?
A sump can provide several benefits to your aquarium. It increases the water volume, which helps in maintaining stable water conditions. It also provides additional space for equipment such as heaters, protein skimmers, and chemical media. Additionally, a sump can enhance the filtration capacity, improving the overall water quality in your aquarium.